Do you have an air mattress that needs patching? The good news is that patching an air mattress seam is a relatively easy task that can be accomplished quickly. In this article, we will discuss step-by-step how to patch an air mattress seam so that you can get back to enjoying your air mattress in no time. We will cover the different materials you will need, how to prepare the area for patching, and the steps for patching an air mattress seam. So, let’s get started on learning how to patch air mattress seam!
Materials Needed

- Self-adhesive patch kit specific to the type of air mattress you own, such as a repair kit for an Intex air mattress.
- Scissors.
- Clean cloth or paper towel.
- Isopropyl alcohol.
Prepping the Air Mattress

- Clean the Seam: Before you can patch an air mattress seam, it is important to clean the seam thoroughly. Use a damp cloth to remove dirt and debris from the seam.
- Remove the Thread: Once the seam is clean, use a seam ripper to remove the thread from the area you want to patch.
- Clear away any Loose Fabric: Use a pair of tweezers to remove any loose fabric or threads from the seam.
- Check the Seam: Inspect the seam and make sure there are no holes or tears in the fabric. If there are, use a patch or adhesive to fix the issue.
Patching the Air Mattress
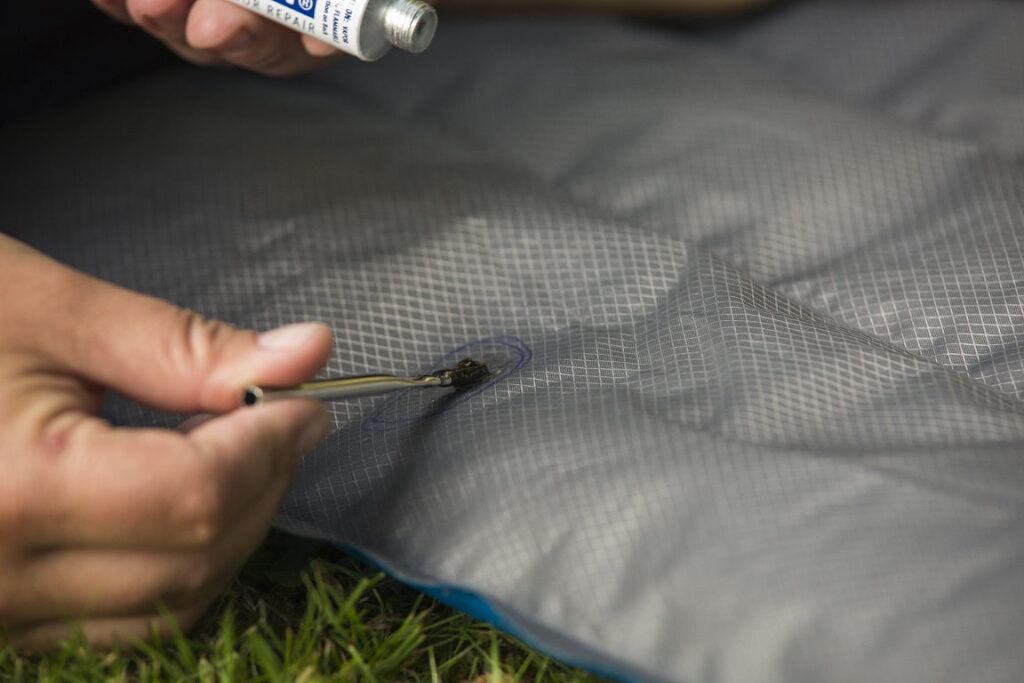
Cut the Patch
Cut a patch from a vinyl repair kit to fit over the seam. Ensure that the patch is larger than the cut, to ensure that the patch does not rip or tear. Make sure to round the corners of the patch for a better fit. Be careful not to cut the air mattress itself.
Adhere the Patch
Spray the patch with adhesive and position it over the cut. Smooth the patch to ensure that it is secure. Let the adhesive dry for at least an hour.
Clean Up
Once the adhesive is dry, use a damp cloth to wipe off any excess adhesive. If necessary, use a razor blade to scrape off any remaining adhesive residue.
Make sure the patch is firmly adhered to the air mattress before use.
Frequently Asked Questions
What Tools are Needed to Patch an Air Mattress Seam?
To patch an air mattress seam, you will need a patch kit, a clean cloth, a pair of scissors, and a blow dryer. The patch kit should include a circular vinyl patch, an adhesive, and a backing material. The cloth should be dampened and used to clean the area of the mattress where the patch will be applied. The scissors can be used to trim the edges of the patch if necessary. Finally, the blow dryer is used to heat up the patch and make it easier to apply.
How long does patching an air mattress seam typically take?
On average, patching an air mattress seam takes about 15 minutes.
- Inspect the air mattress and locate the puncture or tear.
- Clean the area around the seam with a damp cloth.
- Apply the adhesive patch to the location of the puncture or tear.
- Use a rolled-up cloth or a rolling pin to press the patch onto the mattress.
- Allow the patch to dry for at least 10 minutes.
- Inflate the air mattress to check for any leaks.
Is a patch necessary if the air mattress seam has a small hole?
- Yes. Even small holes can lead to air leakage, making the air mattress less comfortable to sleep on.
- No. If the hole is small enough, it can be sealed with a patch.
- Maybe. If the hole is too big, a patch may not be strong enough to seal it.
In any case, patching the hole is the best way to ensure the air mattress stays in good condition and provides a comfortable sleeping surface.
Is Patching an Air Mattress Seam a Permanent Fix?
- Adhesive Patches – These are the simplest and most common type of patch. They typically come with a self-adhesive backing and can be applied directly to the mattress. They are often made from materials like vinyl, rubber, or plastic and provide a temporary, but effective, fix.
- Welding – This is a more permanent solution and requires specialized tools and expertise. Using a welding machine and a special type of welding rod, two pieces of the same material can be fused together. This creates a strong bond that should last for many years.
- Sewing – If the seam of the mattress is intact and not ripped, sewing can be used to repair it. This method involves using a needle and thread to stitch the seam back together. This is a more time consuming solution and should only be used when the other methods are not possible.
Ultimately, patching an air mattress seam can be a permanent fix, depending on the method used. Adhesive patches and welding are the best options for creating a strong, long-lasting repair. Sewing is also an option, but it is more time consuming and may not create a repair that lasts as long.
Can an Air Mattress be Patched More Than Once?
Yes, an air mattress can be patched more than once. While some air mattress manufacturers state that their air mattresses are not designed for multiple repairs, it is possible to repair an air mattress multiple times. However, it is important to use the right tools and techniques or the patch may not hold up. To ensure a secure patch, it is best to follow the instructions provided in the product manual.
Conclusion
Patching an air mattress seam is a relatively simple process that can be completed in just a few minutes. All you need is a patch kit, scissors, a hairdryer, and an iron. With the right materials, you can patch any air mattress seam and make sure your mattress is ready for use.